
Twake Mail - How to use rules
This guide explains how to use email rules in Twake Mail. Email rules are automatic filters that help you handle incoming messages based on conditions you choose.
Use email rules when you want Twake Mail to automatically organize, move, or process emails for you.
Understand Email Rules
An email rule has two parts:
| Part | What it means |
|---|---|
| Condition | The requirement an email must match, such as a sender, recipient, subject, or keyword |
| Action | What Twake Mail should do when an email matches the condition, such as move the message to a folder |
For example, you can create a rule that moves every email from a specific sender to the Trash folder.
Email rules are different from search filters. Search filters only change the messages you see in the current view. Email rules automatically apply actions to matching incoming messages.
Open Email Rules
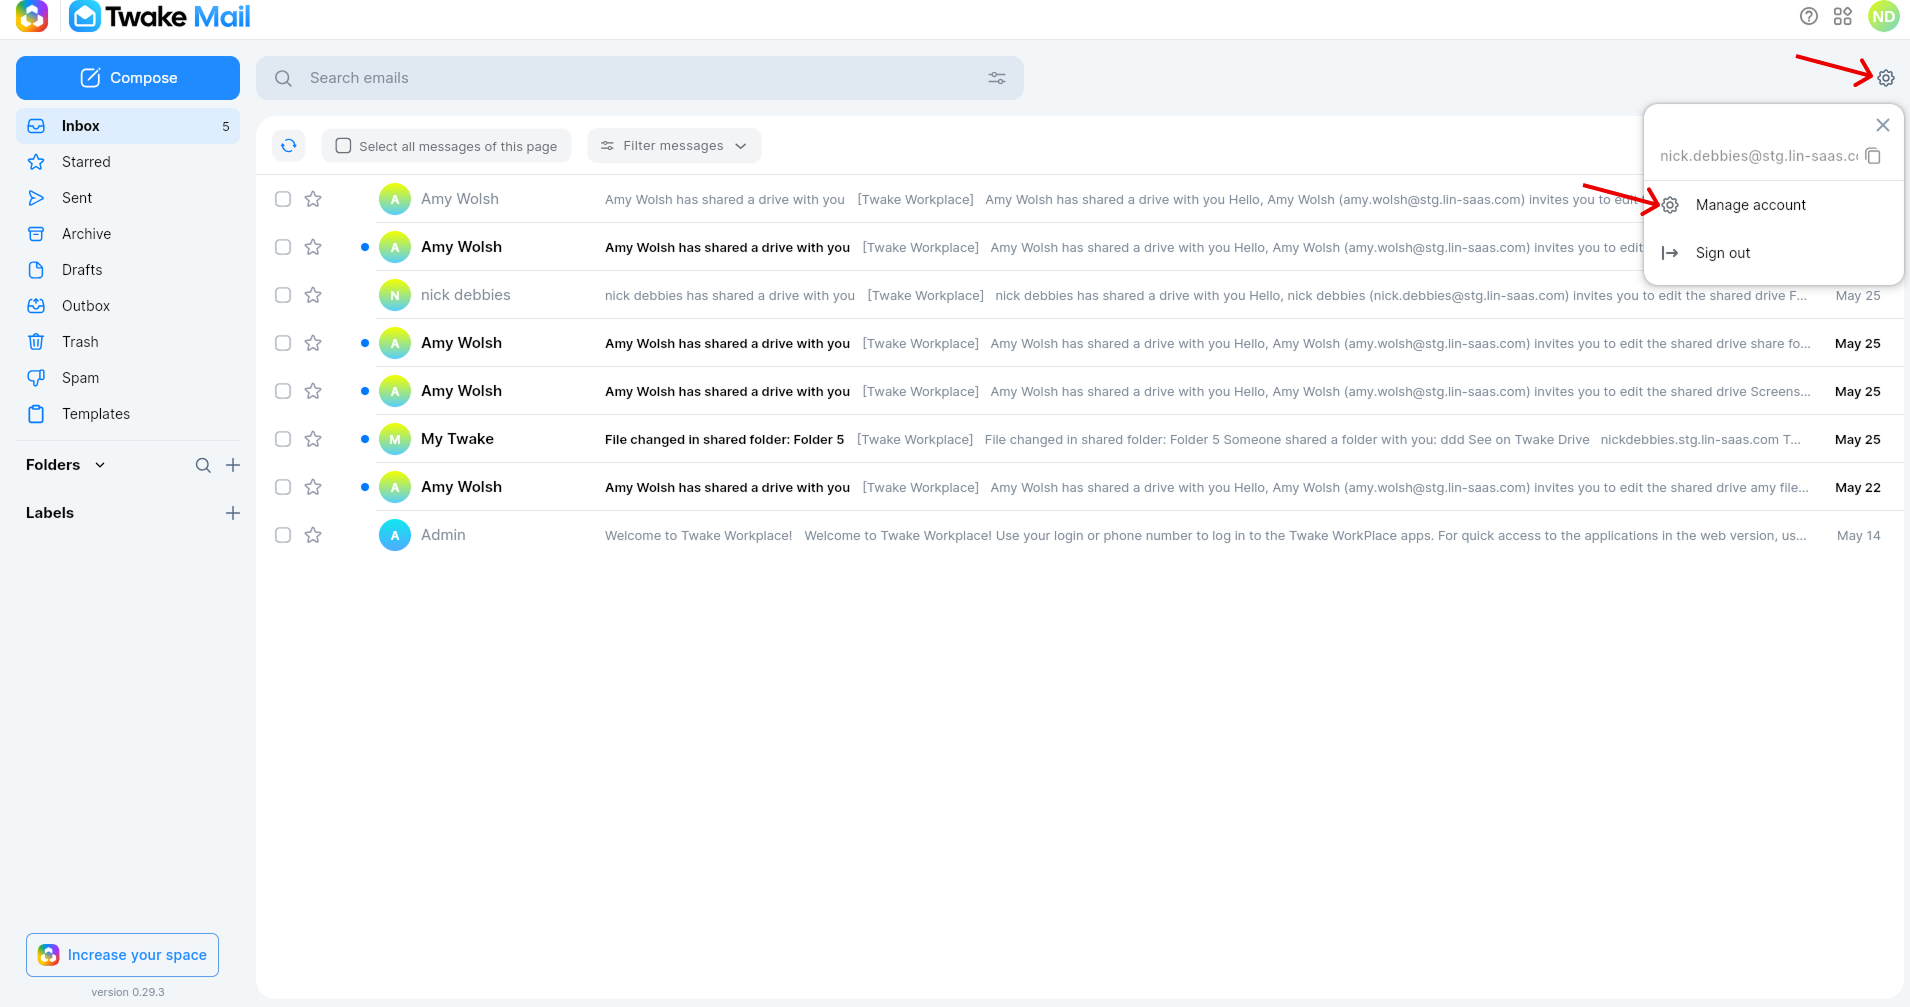
Email rules are managed from your account settings.
To open Email Rules:
- Open Twake Mail
- Click setting icon in top right of the screen.
- Go to Manage account.
- Select Email Rules.
The Email Rules page shows the rules you have already created.
The rules list can show:
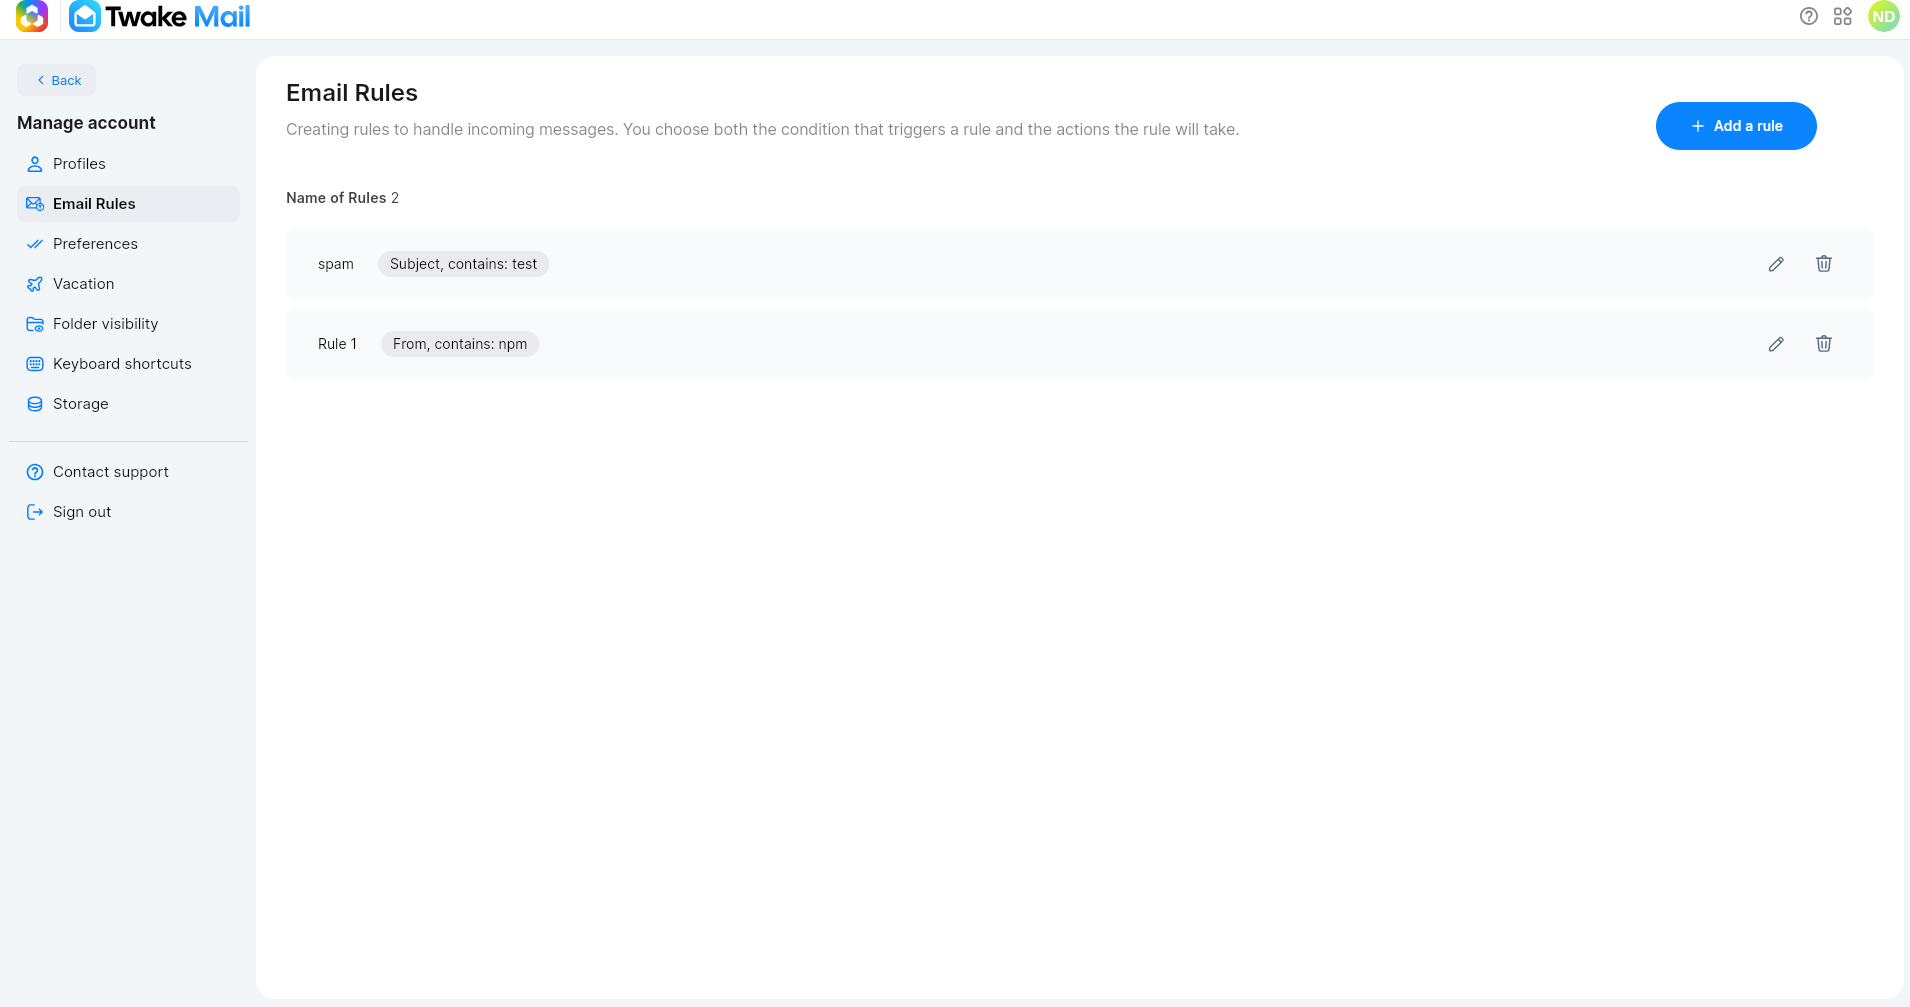
| Item | Description |
|---|---|
| Rule name | The name you gave to the rule |
| Condition summary | A short summary of the condition, such as From, contains: test |
| Edit icon | Opens the rule so you can change it |
| Delete icon | Deletes the rule after confirmation |
| Add a rule | Opens the form to create a new rule |
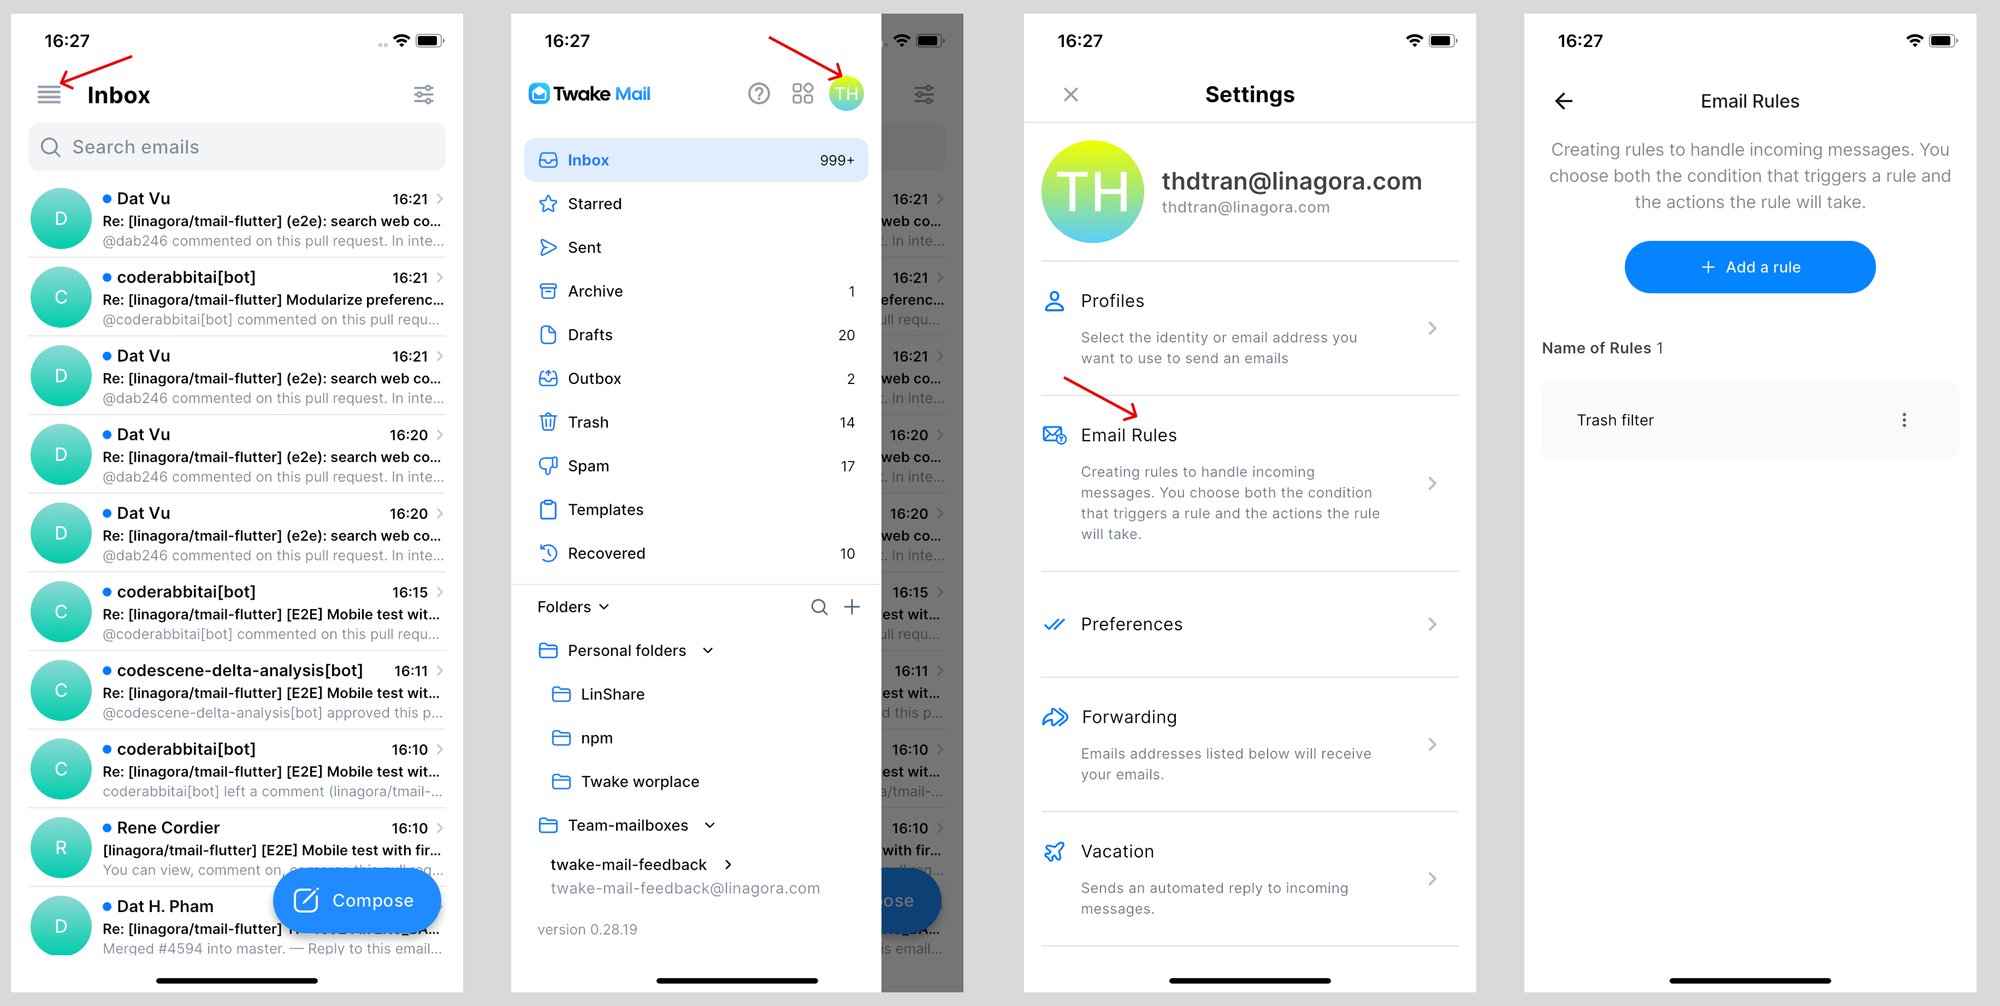
Open email rules on mobile:
Create a Rule
Create a rule when you want Twake Mail to automatically handle messages that match specific criteria.
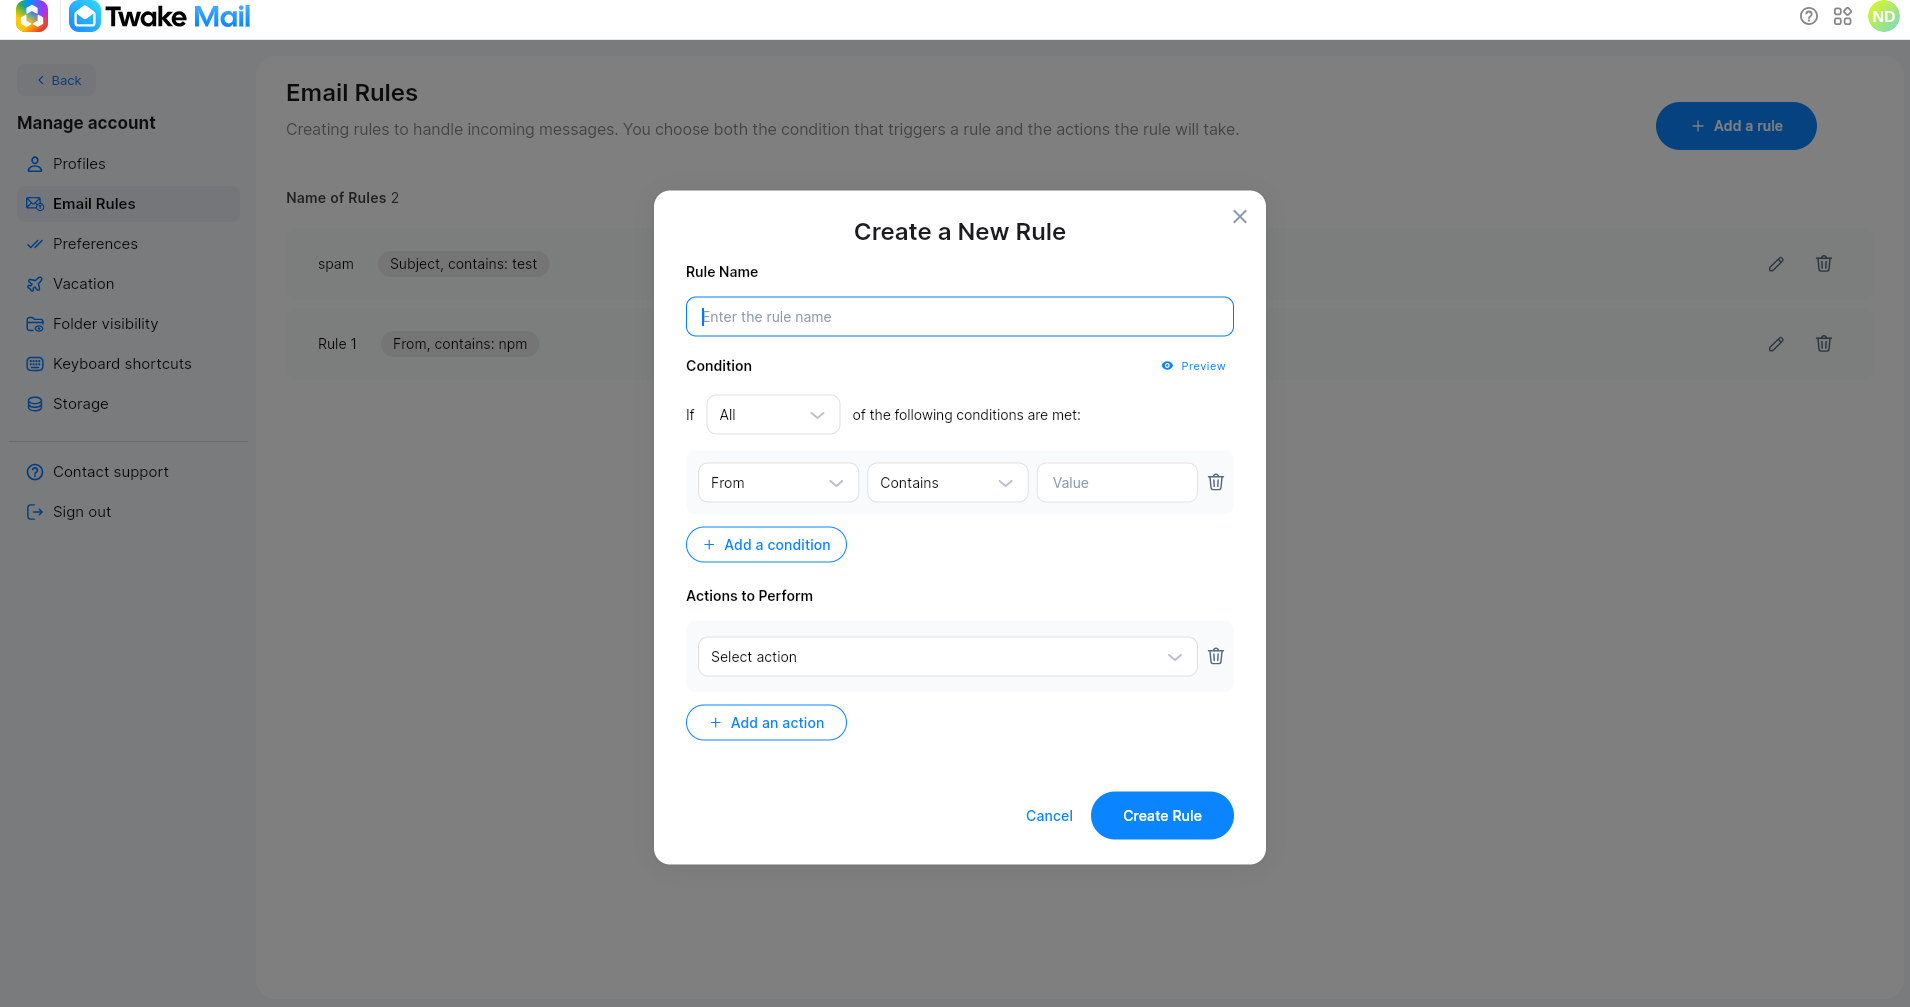
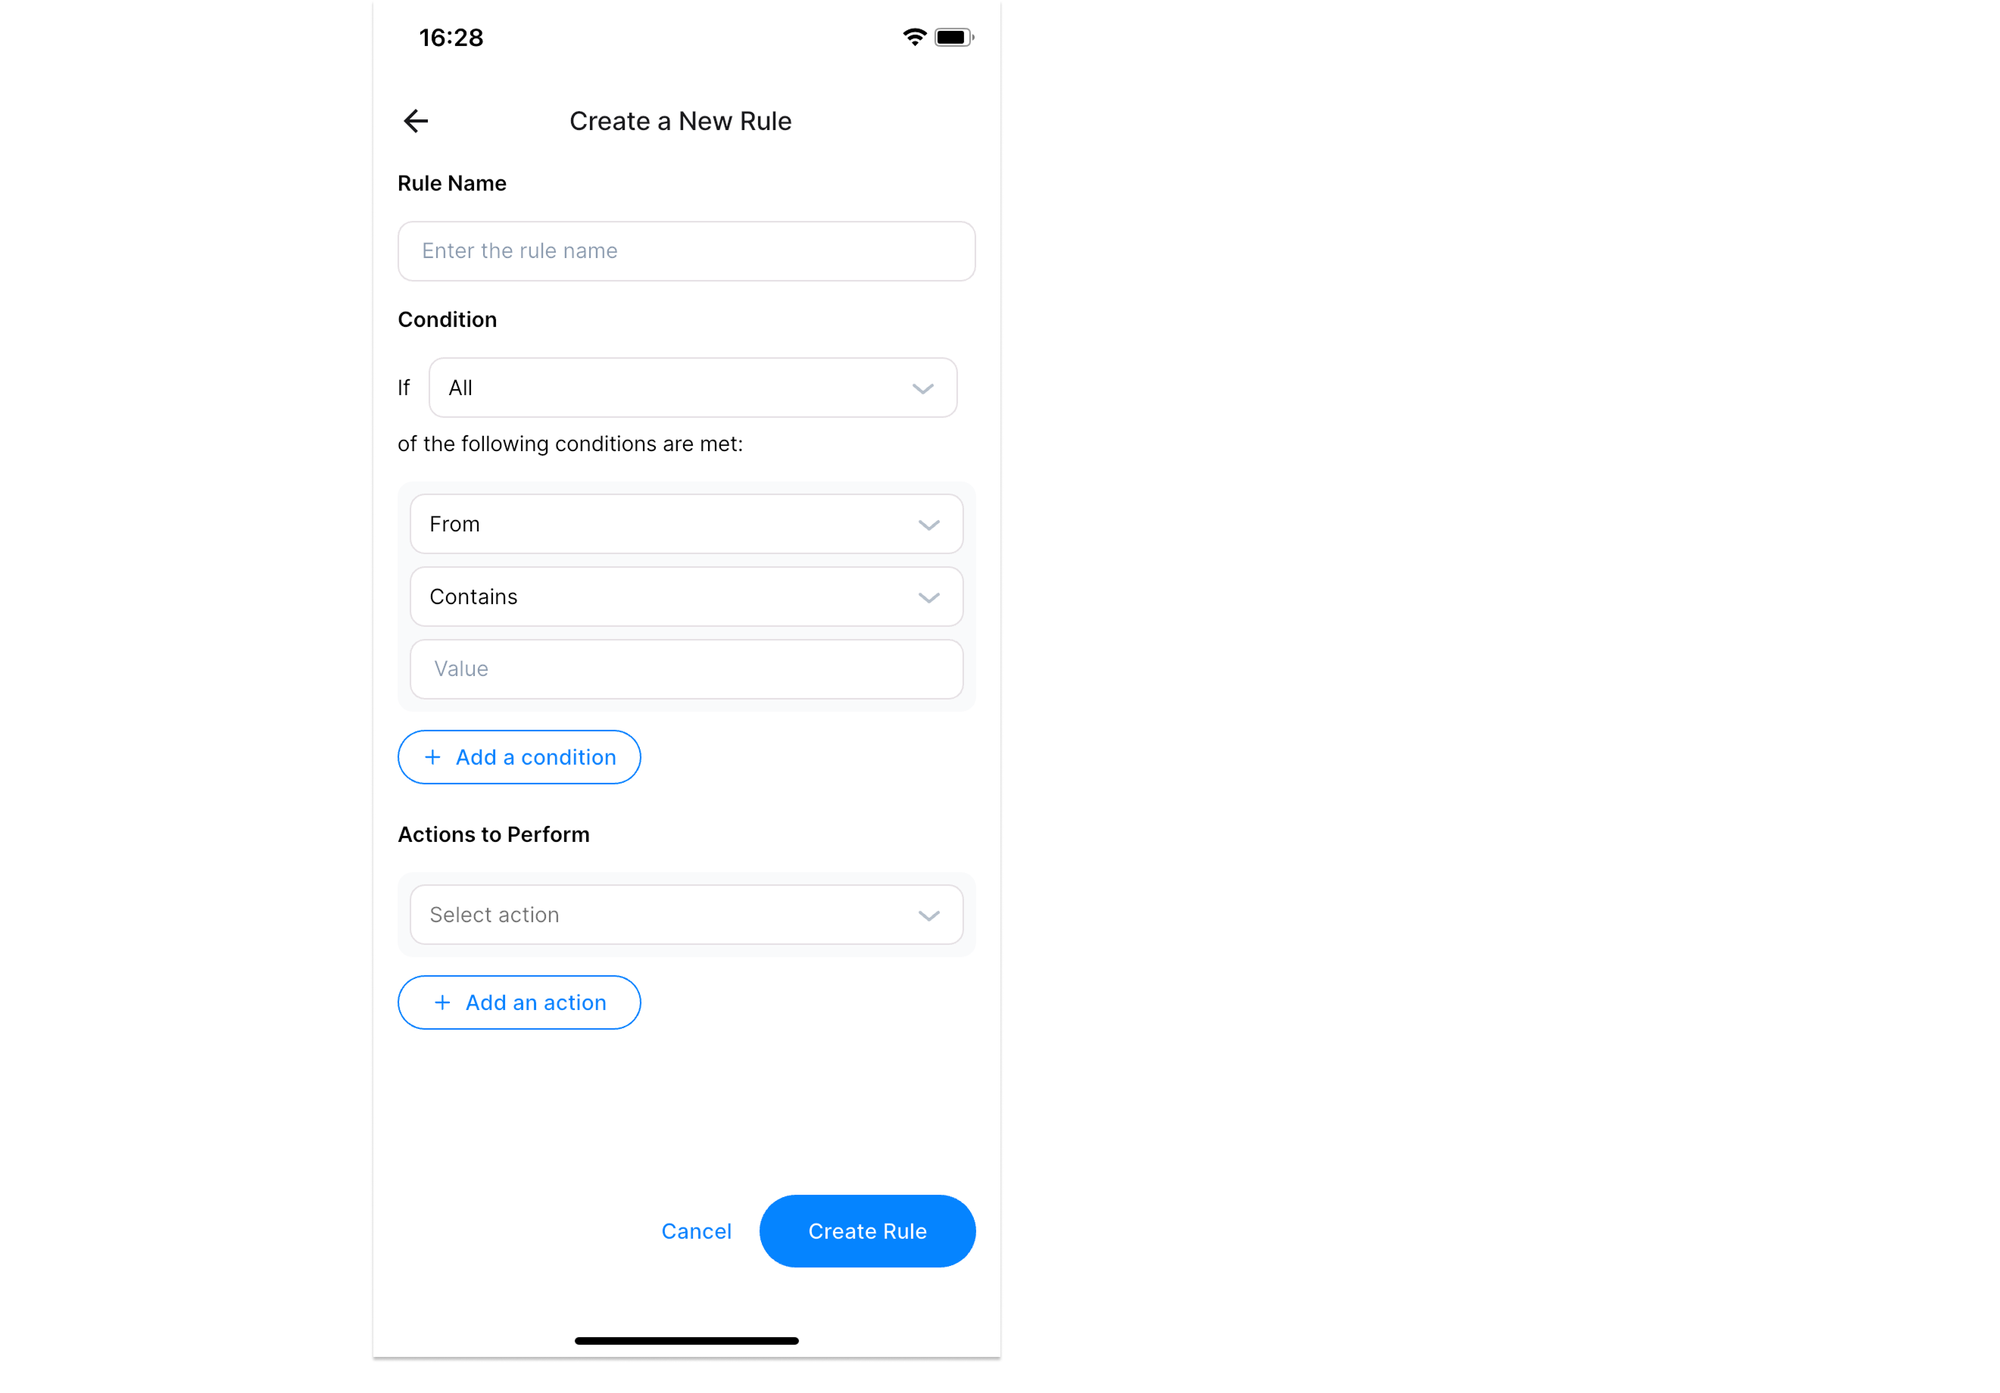
To create a rule:
- Open Email Rules.
- Select Add a rule.
- Enter a Rule Name.
- In the Condition section, choose whether emails must match All conditions or Any conditions.
- Choose the condition field, such as From.
- Choose how the condition should match, such as Contains.
- Enter the value Twake Mail should look for.
- In Actions to Perform, choose the action Twake Mail should apply.
- Complete any extra fields required by the action, such as the destination folder.
- Select Create Rule.
After the rule is created, it appears in the Email Rules list.
Add More Conditions or Actions
Use multiple conditions when one condition is not specific enough.
To add another condition:
- Select Add a condition.
- Choose the condition field.
- Choose the matching option.
- Enter the value.
If the rule uses All, the email must match every condition before the action is applied. If the rule uses Any, the email just need to match one of these conditions
Use multiple actions when Twake Mail should do more than one thing to matching emails.
To add another action:
- Select Add an action.
- Choose the action.
- Complete any required fields.
Preview a Rule
Use the preview option to review what the rule will do before creating it.
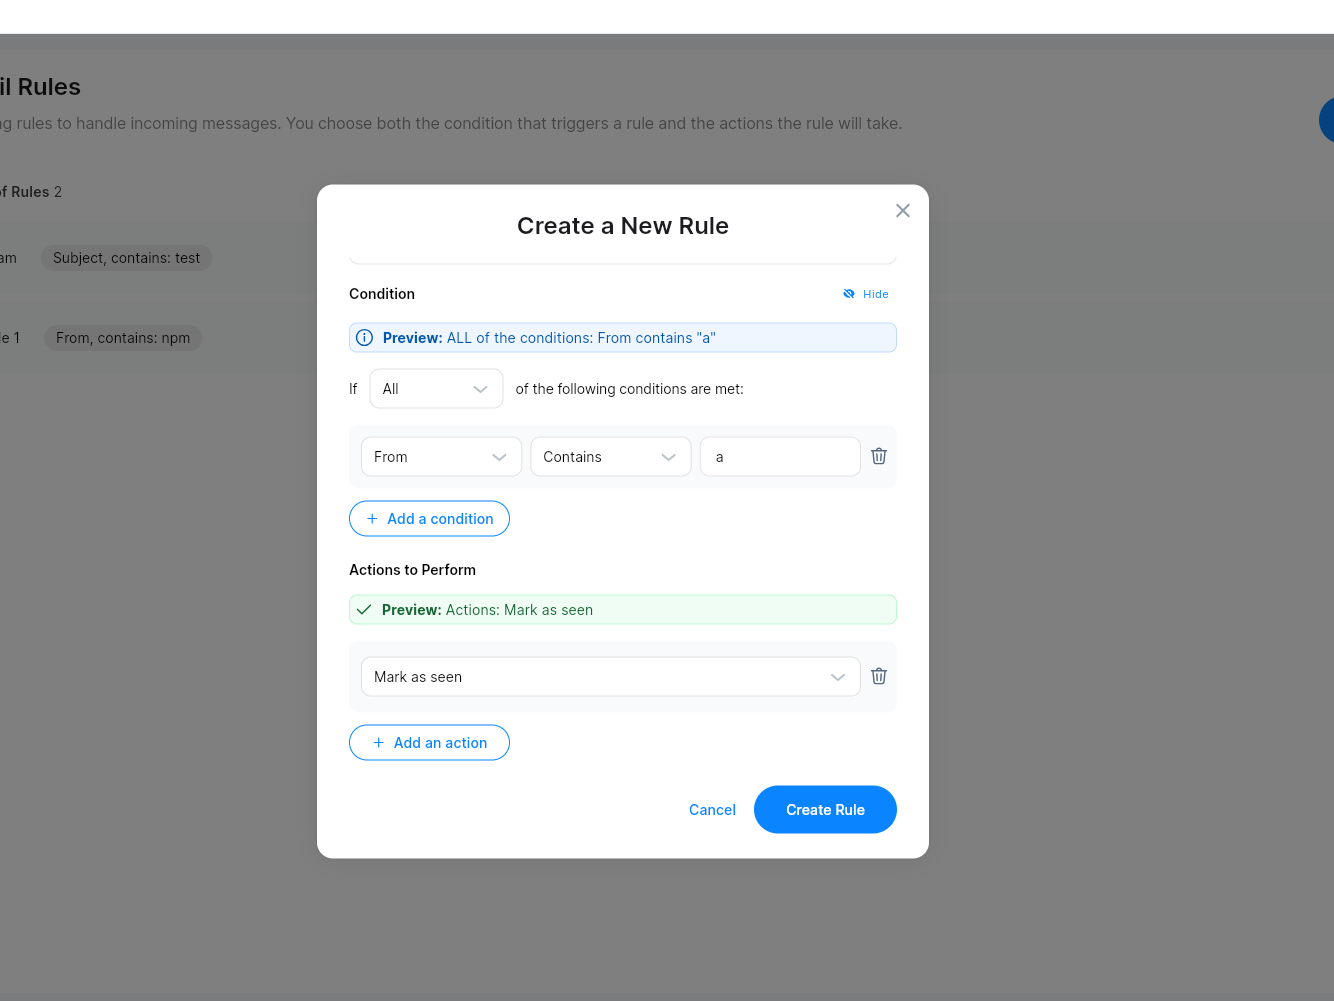
The preview can show:
| Preview section | What it helps you check |
|---|---|
| Condition preview | Confirms which conditions the email must match |
| Action preview | Confirms what Tmail will do to matching emails |
If the preview does not match what you expect, update the condition or action before creating the rule.
Create a Rule from an Email
You can create a rule directly from an email you are reading. This is useful when you receive a message and want future messages from the same sender, subject, or pattern to be handled automatically.
To create a rule from an opened email:
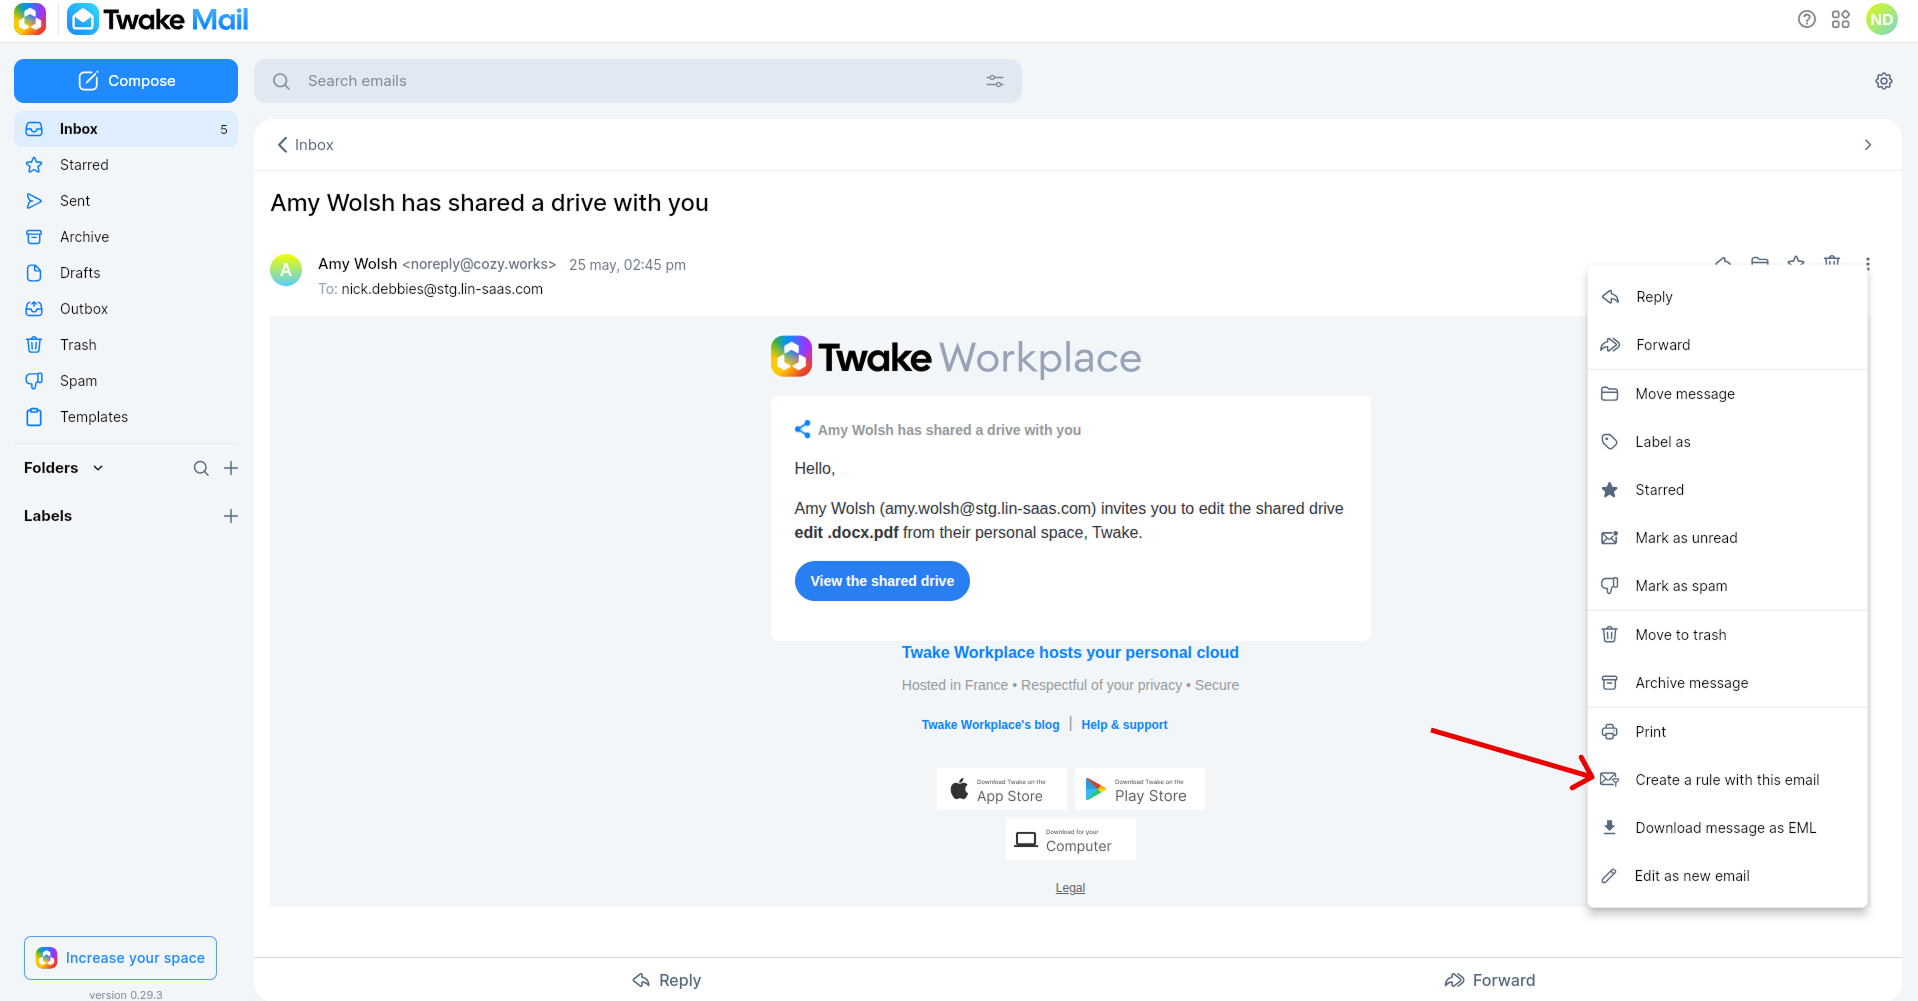
- Open the email you want to use as the example.
- Select the More menu in the email actions.
- Select Create a rule with this email.
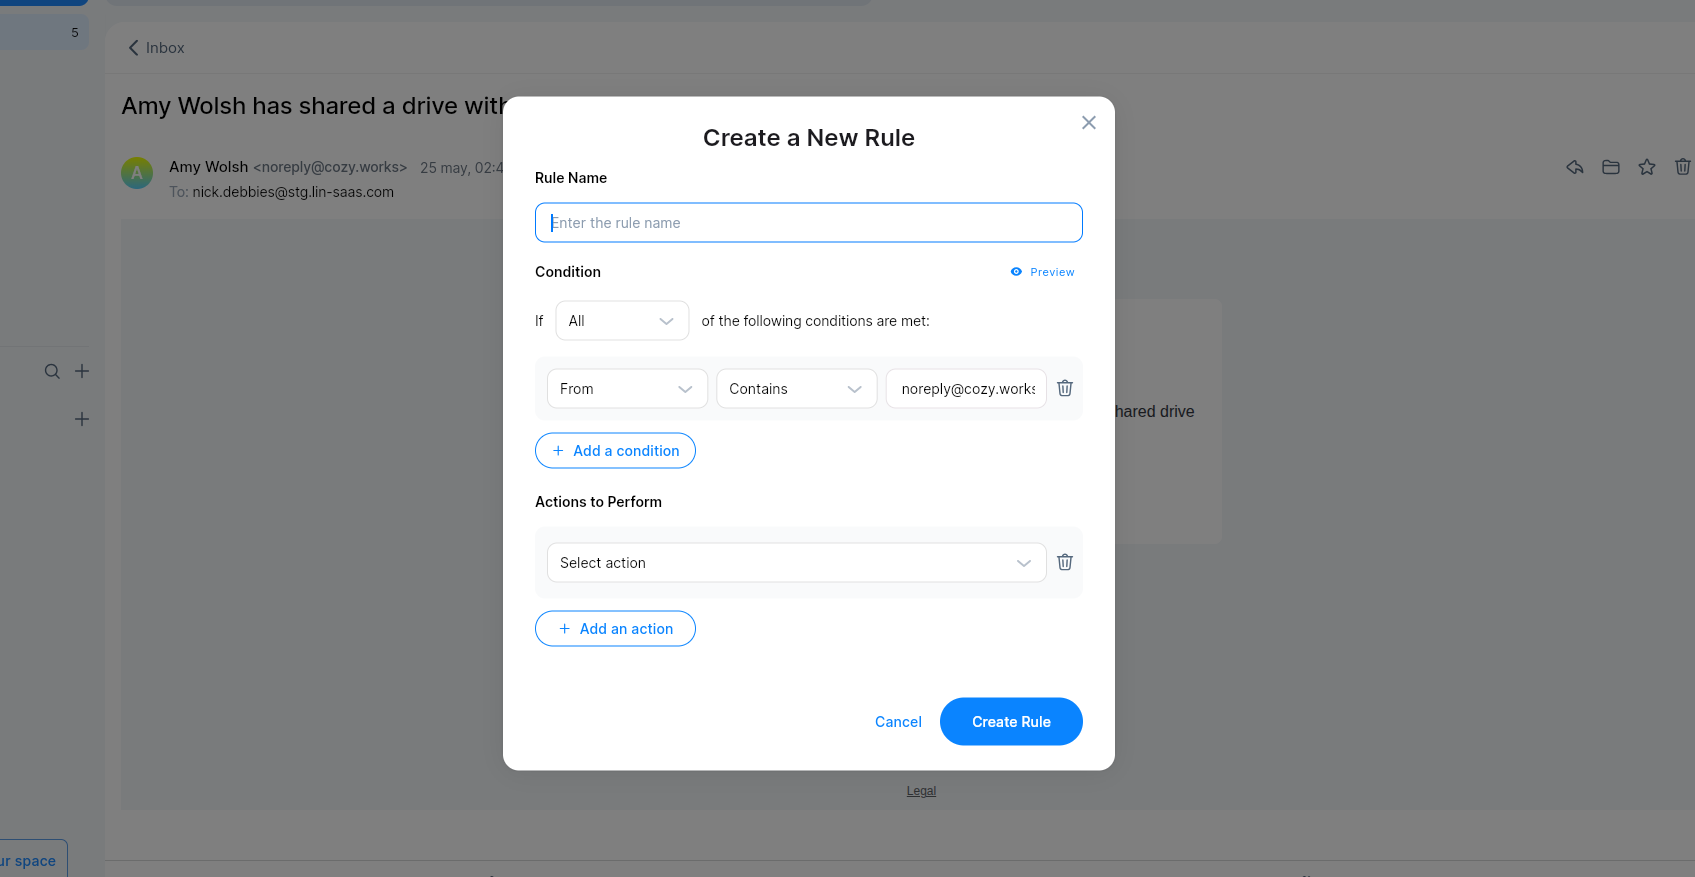
Twake Mail opens the rule creation dialog and fills in a condition based on the selected email.
On mobile:
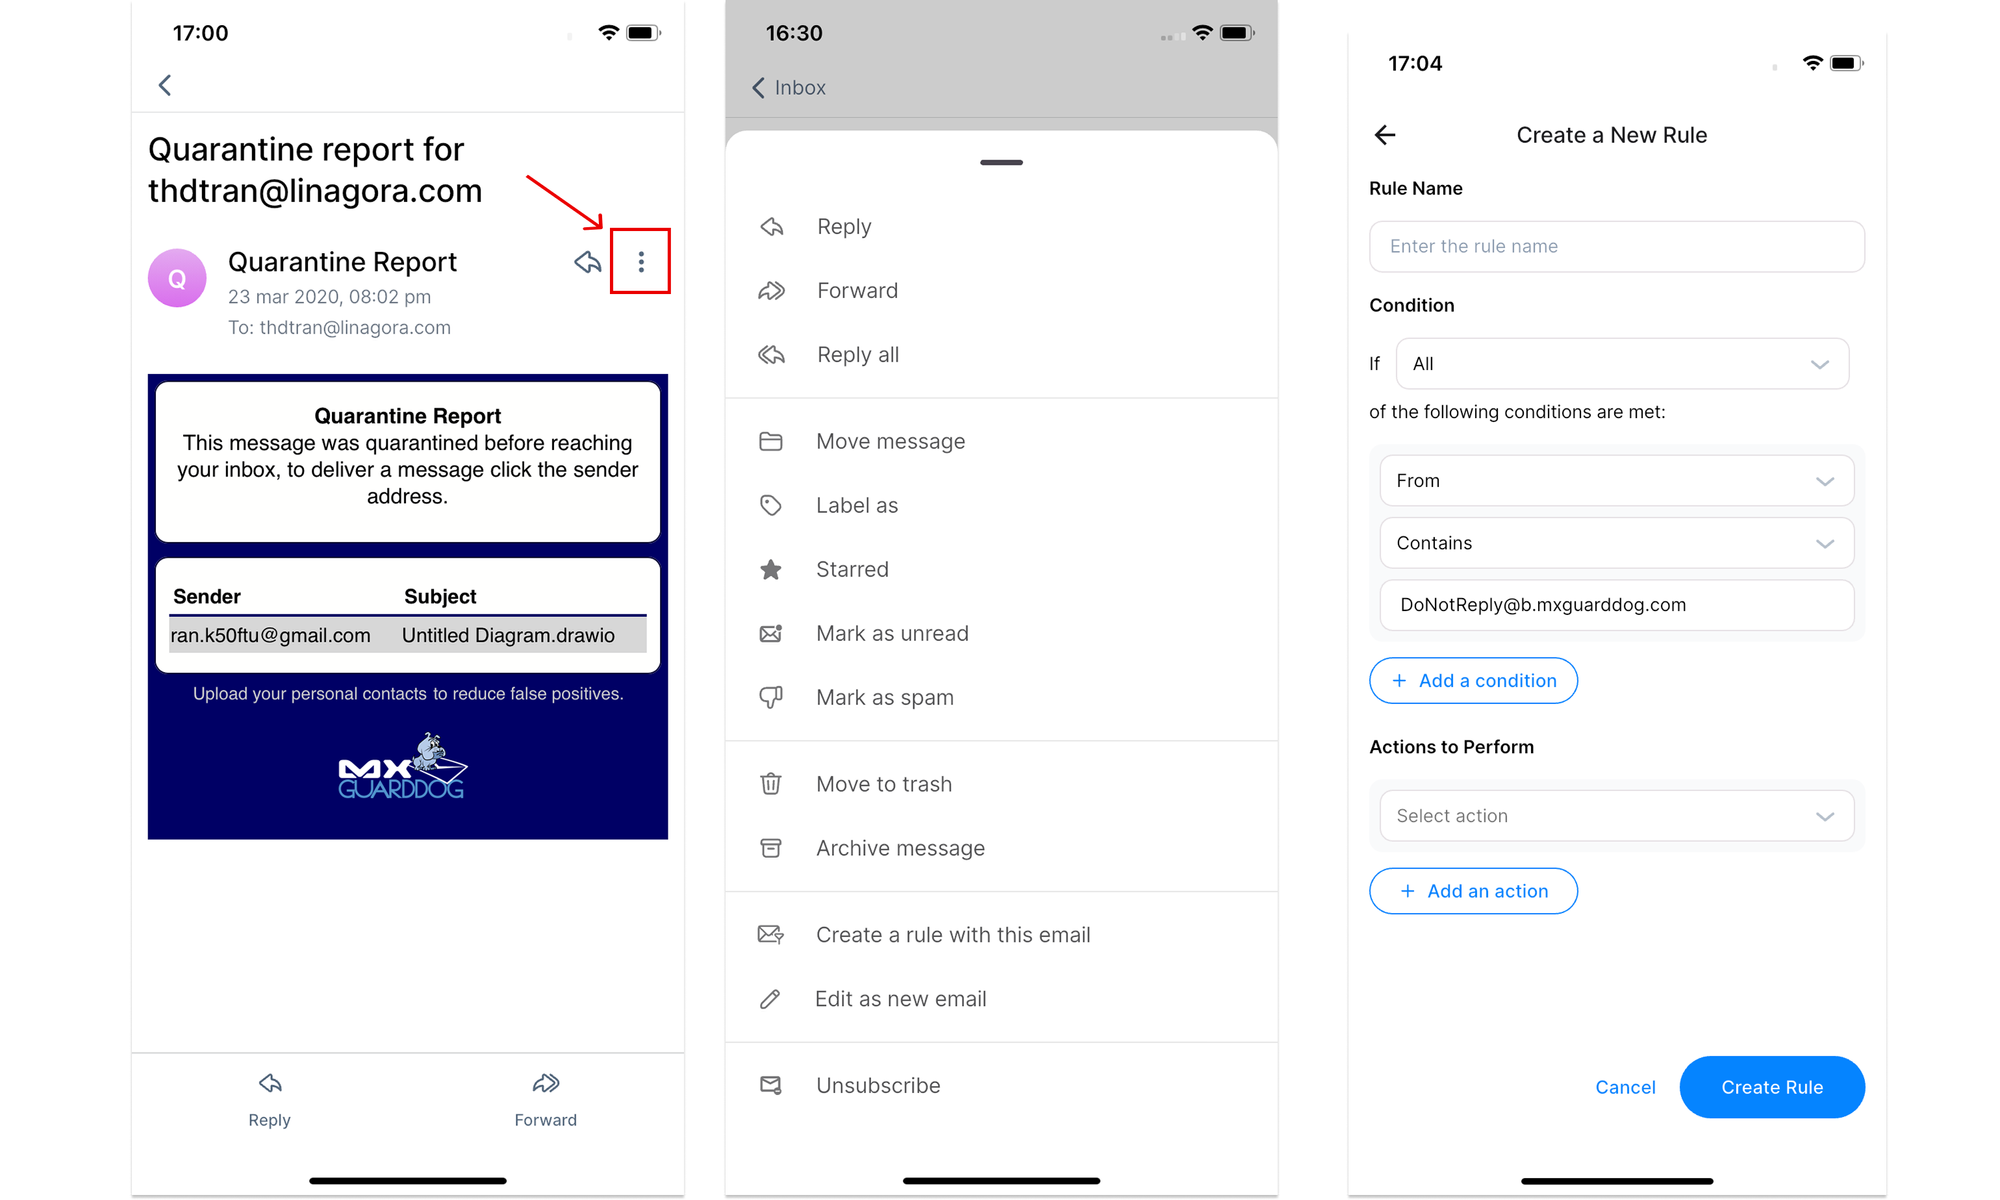
To finish the rule:
- Enter a Rule Name.
- Review the pre-filled condition.
- Change the condition if needed.
- Choose the action Twake Mail should apply.
- Add more conditions or actions if needed.
- Select Create Rule.
After the rule is created, matching incoming messages will be handled automatically.
Create a Filter from a Folder
You can also start creating a filter from a folder menu.
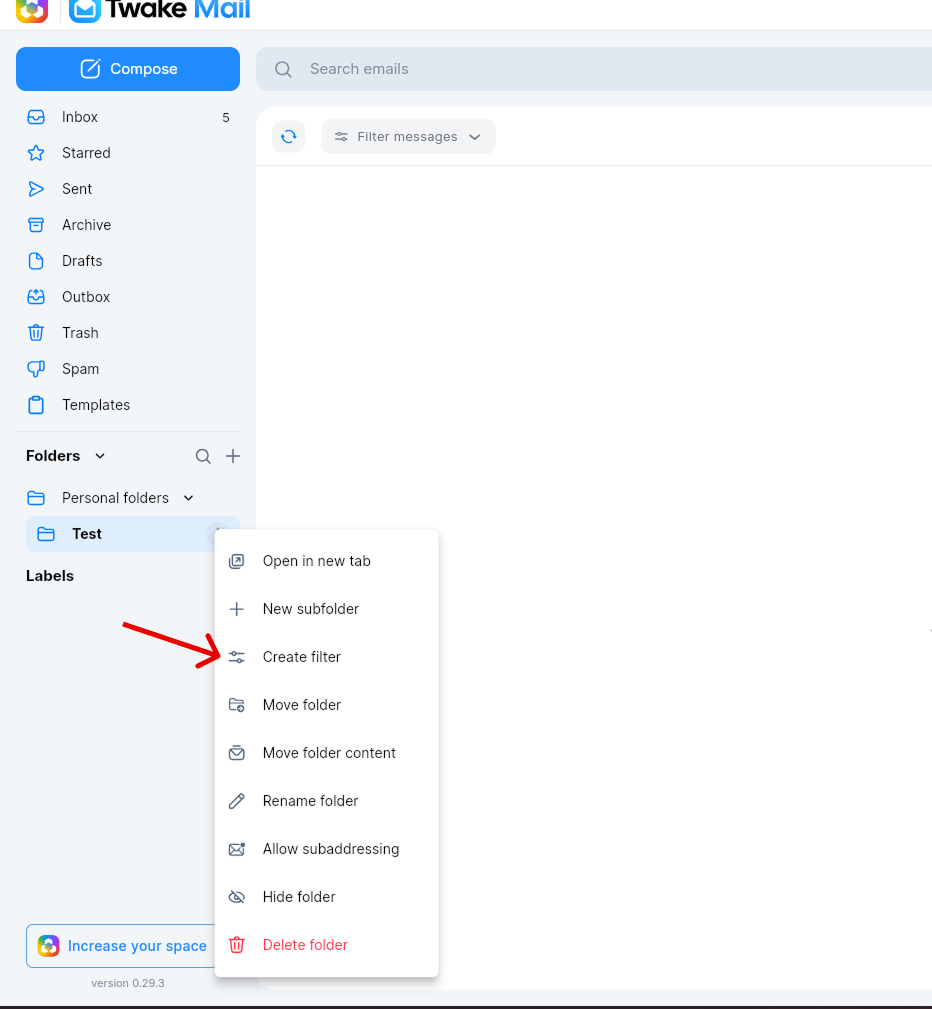
To create a filter from a folder:
- Go to the left sidebar.
- Open the menu for the folder you want to use.
- Select Create filter.
- Complete the rule name, conditions, and actions.
- Select Create Rule.
This is useful when you are already working inside a folder and want to create a rule related to that folder.
On mobile, to open the folder menu, you need to long press on the folder name:
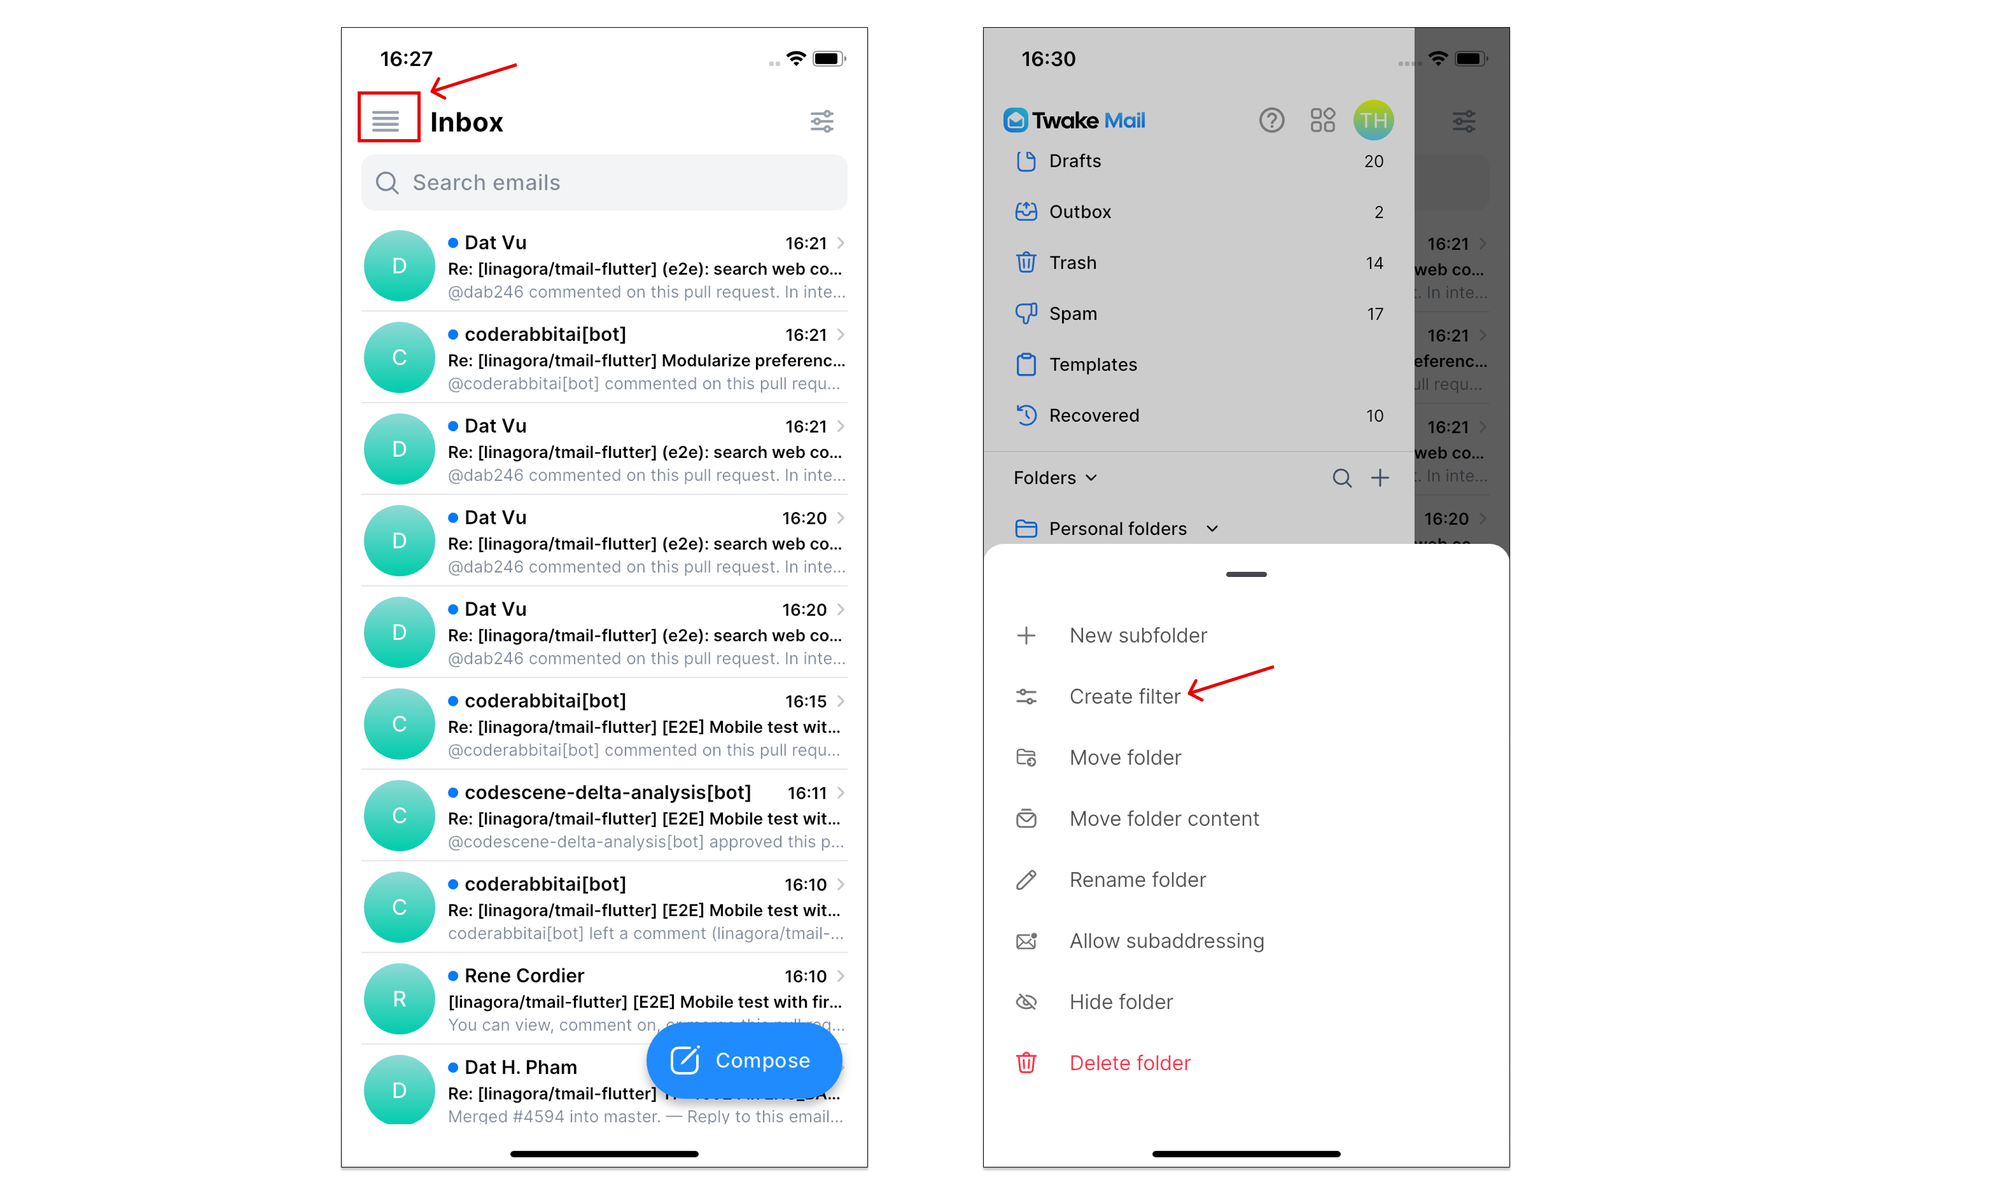
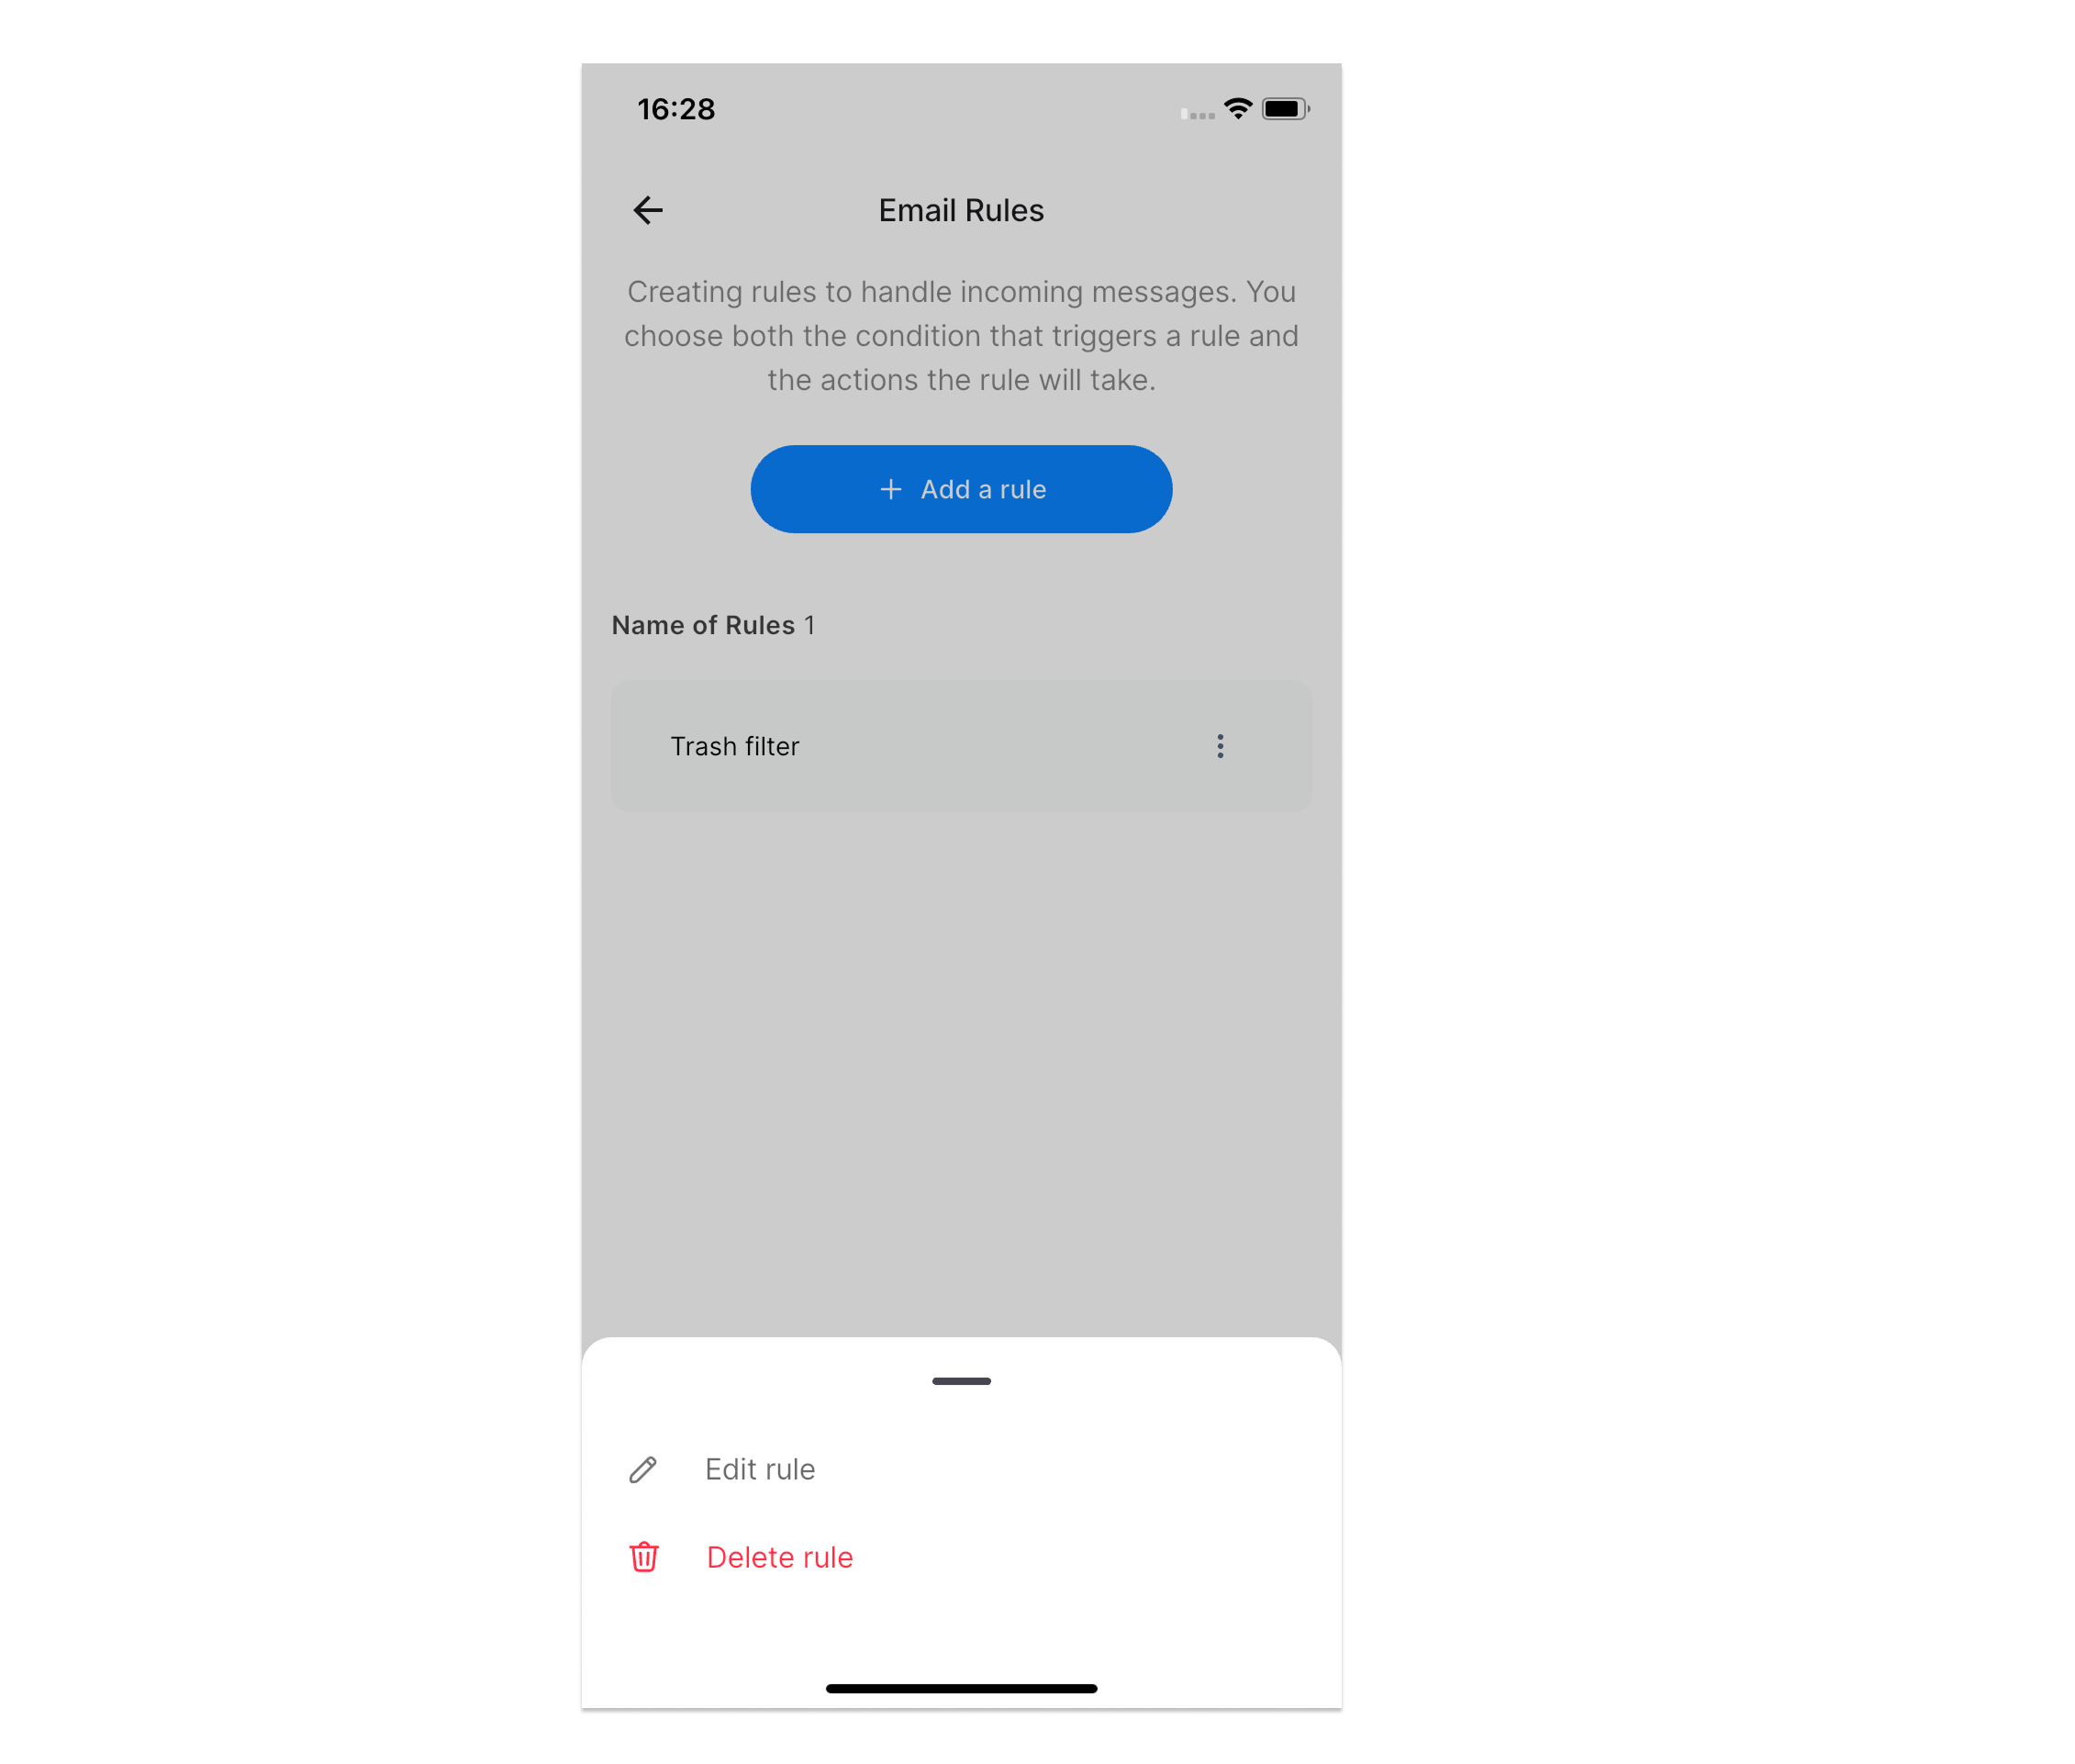
Edit a Rule
Edit a rule when you want to change its name, conditions, or actions.
To edit a rule:
- Open Email Rules.
- Find the rule you want to update.
- Select the edit icon.
- Change the rule name, condition, or action.
- Confirm the change using the button at the bottom of the dialog.
The updated rule is used for future matching emails.
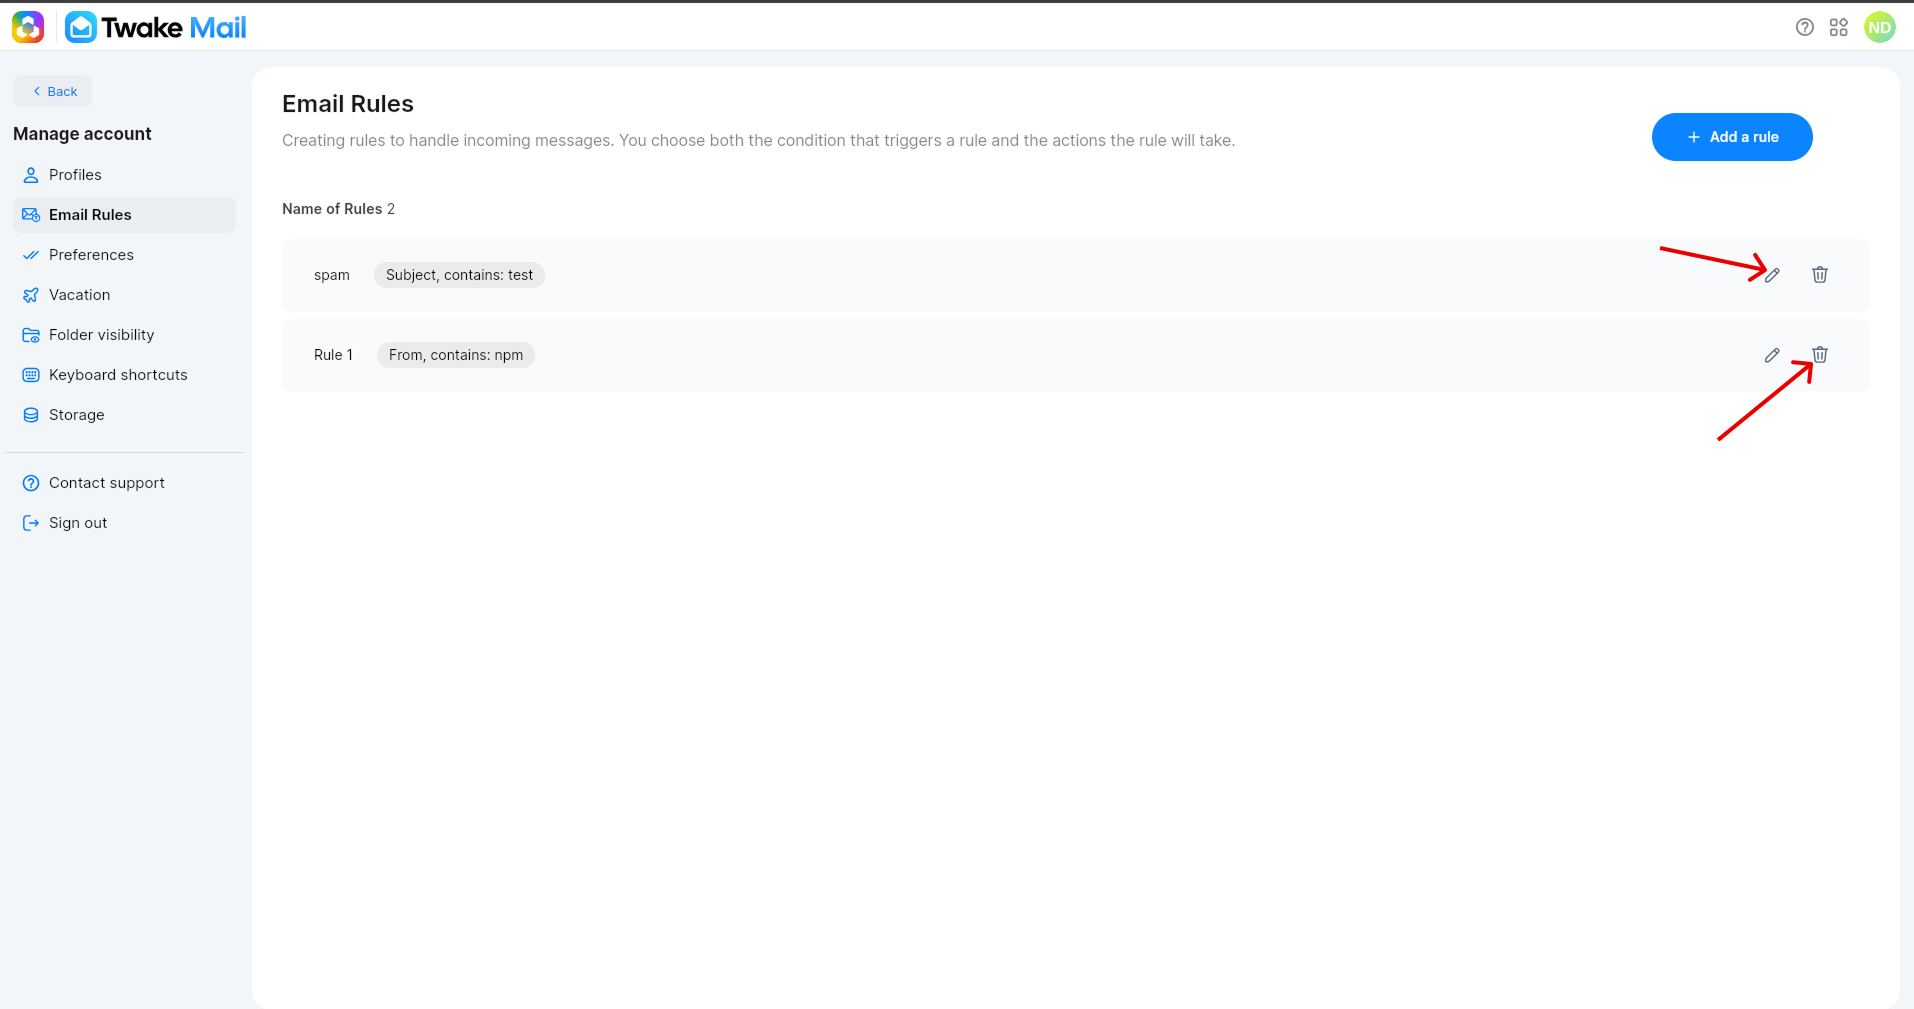
On mobile:
Delete a Rule
Delete a rule when you no longer want Twake Mail to apply it.
To delete a rule:
- Open Email Rules.
- Find the rule you want to remove.
- Select the delete icon.
- In the confirmation dialog, select Delete.
After a rule is deleted, Twake Mail stops applying it to incoming messages.